Anyway.
I'd
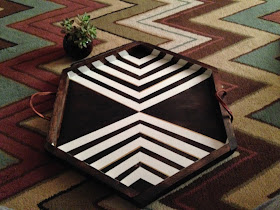
I'd been needing a tray for our bed because it is a full bunk, and we (my roomie Rae and I) have the top. It turned out perfect. I mean, I'm honestly in love with it.
I used two tutorials. One from AlwaysRooney, where I got the basic idea, and the other off of youtube, that I used to cut an exact hexagon shape. I wasn't able to figure out how Rooney cut her boards to get an equal sided hexagon.
The links are listed below:
AlwaysRooney's Hexagon Tray
Equal Part Hexagon Tutorial
I actually didn't end up taking step by step photos of my process because I forgot. Next time, I hope to do better.
What you need:
-Wooden board measuring 20x20"
-Wooden sticks (I bought two four foot sticks) measuring 2x3/4"
-White Paint
-Wood Stain (Your choice in color, I prefer dark wood so I went with a dark oak)
-Gold acrylic paint
-Nails
-Two 6" Leather straps (If you want to add the handles like I did)
-Four roofing nails (To attach the straps)
-Painters tape
I used the tutorial attached above to draw by basic shape. Then I had a friend of mine cut it with his chop saw. I wanted to learn how to use a motor saw, but wasn't quite confident enough at the time. I have successfully used one since, though!
We had a hard time figuring out how to make a hexagon shape.
Then we just got distracted.
This is where I needed more photos, but like I said, I forgot.
After cutting the hexagon, my friend cut the sticks down to size. Now this confused me, but I'm going to try and explain it. The ends of each stick have to be cut at an angle, but they will be angled in the opposite direction. One side of the stick longer than the other. The short side measured at 9 7/8" and the longer side at 10 1/2". The shorter side will be facing outward when you glue and nail it in place.
So, when attaching your sticks to the board, you will take one stick and line the long side, flush with a corner of your board. The other side will pass your next corner, then you slide your next stick under, lining it up with the corner. Continue doing this with all six pieces, until the last stick over laps the starting point.
I know that probably didn't make any sense, but once you're actually holding the cut pieces, you'll understand.. Hopefully.
For the handles, I just nailed the leather where I wanted them to be. That was simple.
Ignore the foot.
Hey! I said ignore it!
To tape off where I wanted the white lines to be, I drew a line down the middle and made each side of the arrow meet at the line. You really just have to eye it.
Then, I stained all around the tape. Retaped it. Painted inside that tape with white. Retaped it and painted thin gold lines beside a few of the white stripes.
And there it is!
I see a few things I could do differently, but for my first wooden project, I think it turned out splendid.
I really like it. Obviously..
Give it a shot! It's a good beginners project and feel free to comment with questions.
Until Next time.
>>> Arrow


No comments:
Post a Comment